mardi 8 octobre 2013

Whistles

I think I've mentioned  before that I'm involved in Hungarian scouting.  Which means that while I am a scout leader, I do my scouting in Hungarian.  In Canada, or in the northern US, as the case may be.  Which is confusing at the best of times (I usually end up giving US Customs a history lecture, when I try to explain how I, a Canadian, am heading to the States, to do scouting.  In Hungarian.  A friend of mine has advised me "don't call it 'Scouts', it just confuses the hell out of everybody; call it a 'diaspora youth group.' Makes more sense.")

Now that I've gotten that out of the way, every year, at the end of September, there's a camp whose theme changes every year, but always has something to do with Hungarian folk culture.  Last year, the theme was the Csángó of Moldavia, a Hungarian population that has lived in isolation from the remainder of Hungarians for a few centuries now, to the point that among other things, their dance styles hadn't evolved with time ("old-style" group dances, as opposed to "new-style" couples' dances; because, hey, who doesn't like dancing?).

I was contacted by a friend who was one of the organizers for this camp, and she asked me to design the camp souvenir.  We have little souvenirs we can hang from our neckerchief woggles, and some scouts' woggles become so decorated with souvenirs, aide-mémoires of various sorts, etc., that they're referred to as "Christmas trees".  Anyway, she had an idea she wanted me to do--a souvenir based on a traditional type of flute, called a 'kaval'.  A kaval is a flute that is open at both ends, is end blown, and in Csángó folk music, is hummed into, as it is blown, creating a sort of drone, along with the flute's 'whistle'.


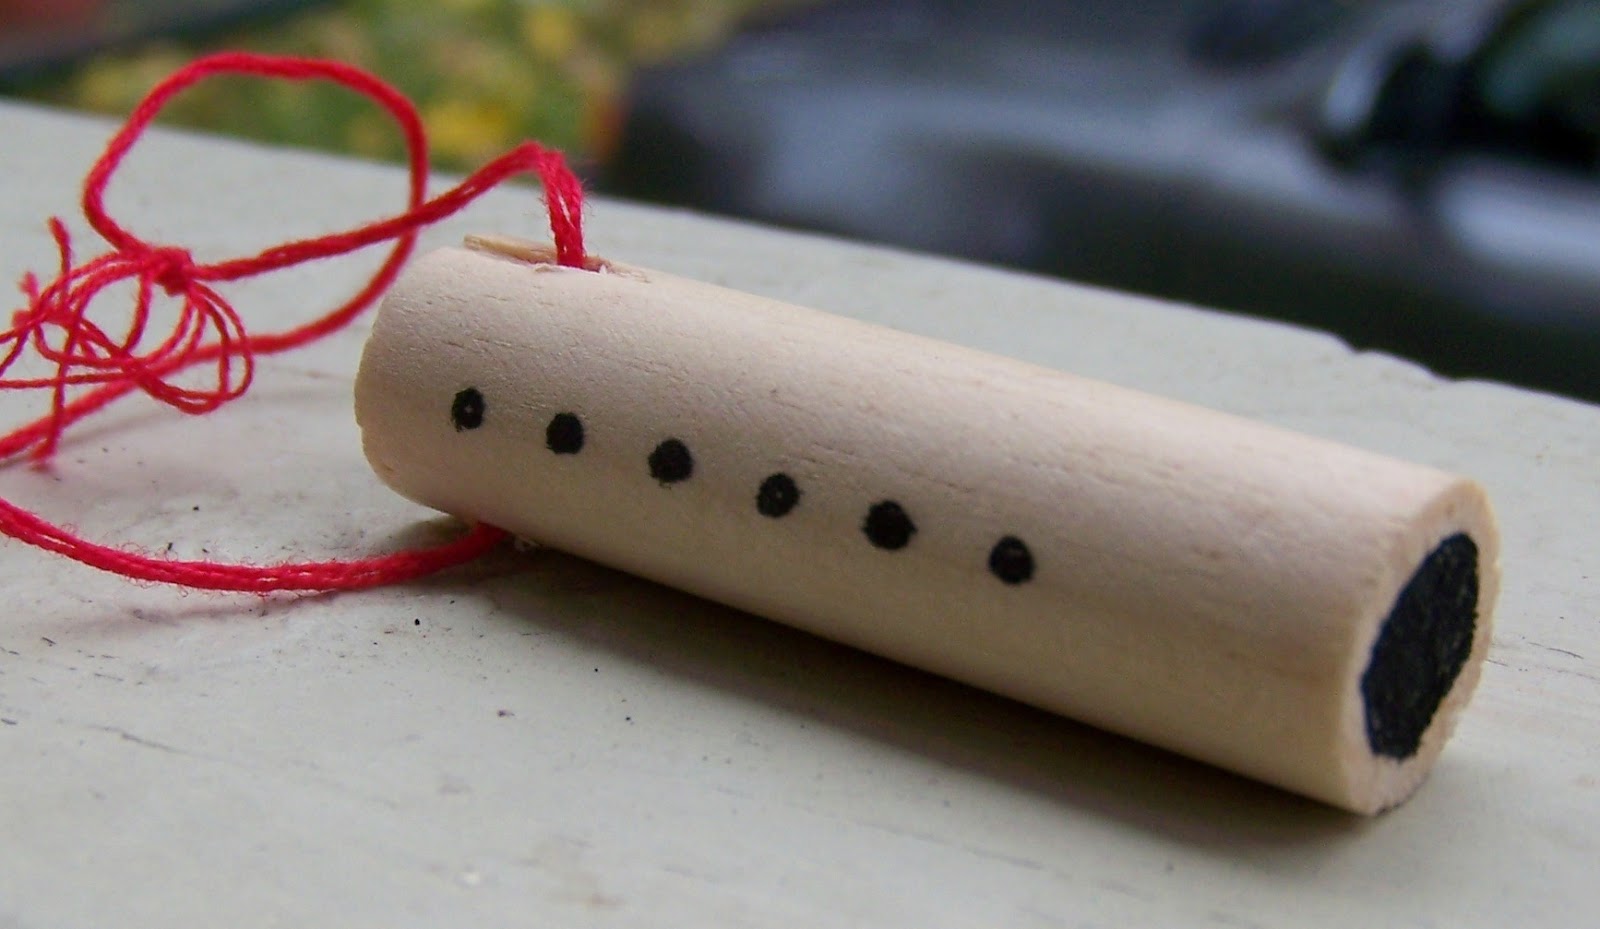
That was all I had to work with, really:  "make it so it looks like a kaval."  Everything else was up to me.  Unfortunately, I didn't have time that week to work on the design, but I had an idea of how I wanted it to come together, how it would look.  My original prototype had a mocked, black-markered mouthpiece at one end, and only five holes.  The final result was more like a real kaval, with "holes" at both ends, and six "holes" for melodies (all drawn, of course; they would have been much more authentic, but much too fragile had I attempted to actually make real holes...).

I had to make about forty or so of these souvenirs, which took me nearly the entirety of the first day of camp.  Dowel rods had to be cut, coloured, and lanyard holes drilled, before I could scribe them.  That was the hard part:  not only having to use a pen-nib on a rounded surface, but wood, at that!  Every once in a while, whether it be from the nib being too full of ink, or whether the wood grain happened to be more absorbent at spots, some of the letters were more, well, blobs, than actual letters.  I decided to go with an Uncial script, for no other reason than it felt right.  And it would be easier to write on a rounded wood surface, than, say, Gothic.  I was also afforded one or two creative touches in the lettering:  the Hungarian alphabet has letters with umlauts ( ö, ü) and "long marks" (ő, ű), and these go over the letters.  However, due to the constraints I had to deal with, I chose to tuck the umlauts of the letter 'Ö' inside.  Thankfully, the word is still readable as "REGÖS", despite the unusual umlaut placement.  Furthermore, instead of writing "REGÖS 2012", I decided to write the year a bit more subtly, and tucked "12" inside the bowl of the letter 'G'.  I doubt there will be confusion as to whether it was Regös 1912, 2012, or 2112.

The souvenirs were very well received.  So well received, in fact, I was asked to do the souvenirs again for this year's camp.  Which, apparently, were very well received.  I think I just excelled myself into a job I can't get out of.


lundi 7 octobre 2013

Phoenix

As a result of having 20 or so projects to be done last year (I work by academic year, apparently--September to June...  Gives me my summers off), and having seen how long it took me to do my projects last year, I was considering dropping a few projects.  I mentioned this train of thought to a friend, and her reaction was "Don't you dare drop [her daughter's], it's her 18th birthday."

So I started looking through my books for something to work from.  I have a decent amount of material on the embroidery of Kalocsa, since it is the most popular style of folk embroidery.  Ironically, this is also why, while I don't dislike it, I try to minimise my use of it.


One result of having such 'standing orders' in regards to cards is that every year, I have to find a way of making each card better than the preceding.  Since my skill level isn't exactly skyrocketing from toddler-scribble to the Hours of Catherine of Cleves (which a) I own a digital facsimile of certain pages of, and b) you really, really, should have a peek at; check Wikipedia or the Morgan Library), it's more on the level of presentation that I have to work.  In the case of this project, it was taking a circular tablecloth pattern, and stretching it out into a hanging banner, and finding another, similar pattern to fill the bottom of the sheet with, lest it look too empty.


Tracing the design, and preparing it for colouring was as usual, a bit time-consuming, but really, no worry.  And this is where the trouble began...


For some reason, I decided not to follow my own instinct and knowledge in how the flowers should be coloured, but decided to try and match the colours in the book with my pencils.  I was half-way through colouring the banner before I stopped, looked at it, went "wait a minute..." ...and noticed that the colours were all wrong.  I don't recall what everything wrong was, but I distinctly remember that the cornflowers, which are light blue, somehow ended up dark, but dark, blue.  Between comparing the book-colours, and laying them on the sheet, the colours were no longer what they should have been.  Unfortunately, as is wont with coloured pencils, I couldn't erase this glaring flaw.  I had to scrap the whole thing, and start from scratch.  Which I did, swearing under my breath of course.


The second time around, despite now having less time in which to finish the project, went smoother than the first time, as I now had a familiarity with the design.  Tracing, lining, and colouring (now trusting my knowledge to the colours I knew, and then adjusting for the ones I needed) went quite quickly.  Scribing went nicely as well, with the exception of what I consider one of my quirky flaws--no matter how centred I set my guide text, I always seem to pull to the left.  The text, as usual, is a simple Hungarian birthday wish, expressing a hope for much happiness, joy, long life, etc., etc.  I'm not translating it.  It would just sound awkward and stilted were I to do that.


Ladies and Gentlemen, may I present to you the Phoenix:  a project reborn of the ashes of its preceding incarnation.

vendredi 7 décembre 2012

Skeleton

One of my friends asked me in June to make a card for her, containing the traditional Hungarian house blessing, for some friends of hers who were getting married.  Only, she didn't need it coloured in, as she was going to make it into an embroidery pattern.  So, I ended up taking an embroidery pattern, making it a calligraphy project, so it could be turned into an embroidery project.


A note about the house blessing...  Most Hungarian homes (or, at least those I've been to) have one of these somewhere, with some form of decoration (usually Kalocsai).  The text is (here comes another horrid translation):

"Where there is faith, there is love
Where there is love, there is peace
Where there is peace, there is blessing
Where there is blessing, there is God
Where God is,
There is no need"

Or, more tersely,

"Where faith, there love
Where love, there peace
Where peace, there blessing
Where blessing, there God
Where God
There is no need"

As a result of it being designed as an embroidery pattern (with lettering), the various parts of the flowers had to be visible, which is why the design was left in a "bare bones" stage, and why it was only done in black.  I'm rather pleased with how striking the monochrome effect turned out to be.  And how popular the resulting work ended up being!  I had one friend make it their Facebook cover photo, and I had another ask if he could get an identical project (coloured in, of course).


The reason I've so delayed with posting this, is because it just feels too short.  However, since there is no colouring, that's about 2-4 hours of work that didn't get done...  So, short and sweet.

samedi 20 octobre 2012

Colourblast


I know, I know, I've been remiss in not updating the blog...  I went on holidays this summer, and real life took a little more time than I wanted it to.  But I'm back!

So--back to business it is!

In October of 2011, while at another one of the many innumerable scout camps I attend (yes, it's hyperbole, but it feels that way sometimes), I had brought some of my work with me, because I wanted to pick a more knowledgeable friend than I's brain (I hope that statement made sense) about the colour scheme for a project I was planning on working on.  Unfortunately, the colour scheme was too complicated for me at that point, so I decided to select another design, and proceeded to create that one (This turned out to be Switcheroo).

As it would happen, one of my friends either asked me to make one, or I volunteered to make one, or a bit of both.  She said that she'd be happy with whatever I create, so I felt free to select a design from a region that I hadn't attempted before (incidentally, this happened to be a different village, from the same region as the original Switcheroo was supposed to be.  Funny, that).  In an attempt to "streamline" my production methods, I started working on two projects concurrently, the other one being Embroidery.

Now, and I ascribe this to be 100% part of the learning curve, it happened that one of the background textiles for these two concurrent projects was 'unbleached linen', the other 'white felt'.  For some reason, I decided to dye both sheets.  The usual tea-dye process.  Quite simple, and a relatively easy way to get rid of old tea bags that won't be drunk (because, well, they're bagged tea, not loose leaf.  But that's another topic entirely).  Both sheets were slightly dyed, a coat or two, and then I put this one aside, to concentrate on Embroidery, which was due considerably sooner.  Once that was done, it was back to this, and this is where the problems started...

One thing that I've been learning (and I'm still learning, much to my dismay, at times), is to really, really, REALLY pay close attention to the colour scheme, and inspect it carefully.  Somehow, I looked at it, saw that it was more or less a mirror-image design, easy as pie.  So I started colouring it; I finished the central flower, and thought that it looked quite odd with what I presumed to be a central flower of red, and an outer flower of differing colours, but, red again.  It was only when I decided to take a longer look at the scheme that I realized that, while indeed, the inner flower on the two outer flowers were of one colour, the central flower was the same, inside and out, separated only by a thin thread of green.  Oops.  I tried erasing the inner ring of red, but wouldn't you know it, those darn artist coloured pencils are quite difficult to erase!  And I didn't want to start problem-solving on the project ("Can I erase more?  No.  Can I scrape off the layer of colour?  Yes, but now the sheet's uneven."), so, I was left with one solution:  restart.  Which I did.

Oops.
 This time around, due to time constraints, I didn't dye the sheet.  Which means that of the two sheets that were dyed (remember Embroidery?), the one that shouldn't have been dyed was, and the one that should have been, now wasn't.  Odd, that.  Colouring went well--as long as I had a scheme to follow.  Then, suddenly, the colour indications stopped (somewhere around the middle of the design, meaning that for the right side, I was on my own, as I was for the birds, and the central stitching).  Well, not quite.  The central "wave" of stitching had the colours indicated, but not where each colour should start and stop.  But, I seem to have figured out well enough on my own.
 
Much better.

Once that was done, all that was left was the writing.  I'd managed to find a greeting I liked, so that was no problem.

Now, if you've been reading past posts, you'll have noticed that there's always something I'm dissatisfied with in my projects; something that I may have been satisfied with at the beginning, but with distance, I shake my head at:  and we're now at that point.

I'm not dissatisfied with the choice of text.  I'm dissatisfied with how I chose to present it.

I have a marked preference for medieval scripts (carolingian, gothic, and uncials, mainly), and this time around I chose to use an insular minuscule.  Only, for some odd reason, I decided I would incorporate an aspect of another post-uncial minuscule (Luxeuil minuscule):  ligatures.  And this took away from the legibility of the text.  Insular minuscule is not a ligatured script, and yet I insisted on combining 'E' with its following letters" 'z', 'n', etc.  But the problem is most marked with the word "szeretet" ("love"), which looks more like "SzErEcEc".  I also should have reduced the size of the 'e''s and 's''s.  They look odd being so large when everything else is small (and especially so in the middle of a word!)

Another project done, another lesson learned, and more knowledge as to how to accomplish the perfection I so seek in calligraphy...

dimanche 15 avril 2012

Embroidery. Just for Men.

So far, all my projects have been made for my lady friends (I know, it's a stilted phrase, but you'll understand). I've been uncertain how to approach my male friends on the idea... "Hey! I made you a card with pretty writing and flowers!" "You're a dork, Georges..." So I was quite pleased when I was talking with one of my friends from New York, when we agreed to an exchange--he would carve me a spoon, I would make him a card. Thankfully, my main resource for the patterns I use for embroidery had a number of designs, from different regions, that would beyond the common colourful patterns Kalocsa, and Palócföld (Kalocsa is a small town in southern Hungary, and Palócföld is a region in northern Hungary, for those who haven't been here since the beginning). There were also a few patterns from what are called "cifraszűr".

Cifraszűr need to be described... These were felt "overcoats", which Hungarian shepherds wore. They were made of felt, and were quite warm (including in the summer, although they weren't unbearably hot). The interesting thing about them, is the embroidery. These were embroidered with wool, not cotton or linen thread. They were also only embroidered by men, the "szűrszabó", which were formed into 'guilds' in the main centres of production. And, as the cifraszűr was found in many different areas of Hungary, while the overall form was the same, with few differences (the sleeves would be long, which was the main type, or they would be short, "stubby" things sown shut with a "plug", and used as pockets. These last forms were more common west of the Tisza river). They would be richly decorated; the back panel, hanging from the shoulders would often be richly decorated, and have rosettes at the corners. The lapels on the front would be decorated, and often stretched to the bottom edge, which would itself be decorated, as would the seam at the back, and the waistline. They were also "closed" with a buckle at chest-height. One of my favourite articles of Hungarian clothing, which I would dearly love to acquire an example of! (Unfortunately, I have been unable to find a usable picture of a cifraszűr. But it's easily Googleable.)


One of the first things I had to do with this project was actually dye the paper. Yes, good old-fashioned tea-dyeing, to give it the look of white felt, which, of course, wasn't "printer-paper white". This had the side-effect of curling the paper, since I had a short time in which to dye it, let it dry, and trace the design, before I left for a visit to Québec City. Thankfully, as a result of storing it in a portfolio, it's now lying quite flat. The colours were an interesting discovery. So far, I'd been able to get away with using plain colours, without having to blend (I definitely don't have an art background...), but the colour scheme for this one was red, pink, and... dark and light "Bordeaux" (which is in itself a dark red). Which meant I had to discover the secret to blending colours. In this case, I think I succeeded quite well.

What surprised me, was the amount of red involved. How red it was. Of course, the colour scheme showed where the red would be, but I've yet to be able to visualize the colours on a blank design. The pink and bordeauxs softened much of the initial shock as to how red it was, but I recall wondering whether I'd made a smart choice in design. And since I was using watercolour pencils for the first time, I didn't realize that they would rub, and I ended up with a nice red glow around the design itself. Which was for the most part subsequently erased, after having shifted my hand and arm position for the remaining colours (touch the paper as little as possible!).


The greeting was another problem. Since this was a birthday card, it had to have the appropriate greetings of goodwill, happiness, etc., etc., but I didn't want something along the lines of "all the stars are dancing for you, because an angel told me it was your birthday". Sometimes I'd think I found one, and then later reread it, and decide against it. Finally, one said (get ready, this will be a horrible translation) "I wish the days of your life will be like the surf of a clear brook". It sounds better in Hungarian.

Early on, I had decided to use a Gothic script for this one (it seemed more "manly" than most of the other scripts I'd used to this point. But certain types of Gothic can be quite difficult to read when written in large amounts, since the excellence of Gothic isn't judged by the individual letter or word, but rather by the appearance of the entire sheet. If the page looks even, equal, nothing standing out, it looks like it was "woven", it's a good example. If there are "holes", or if something stands out, it loses its cohesion. One of my books had an example of Gothic with "spiked" foot serifs, which lent weight to the script. Combining this with my script, it kept it readable, but also accentuated the letters themselves, without taking away from the overall appearance.

He was well pleased. Enough said.

lundi 9 avril 2012

Redbirds

Things seem to have begun panning out. At the beginning of March, while at a weekly scout meet, I was speaking with a few other leaders, when somehow, my calligraphy came up. It may well have been me, saying "have you seen my calligraphy?" (Yes, I know. Very subtle.) One of the leaders turned to me, and asked if I'd consider doing a project for her mother's 75th birthday. And, here's the clincher, I'd be paid for it. Of course, I said yes. A) I get remunerated for a project, and B) word of what I do spreads. Wonderful. By the end of March, we've finalized on the design that will be used, the text, the greeting. (The style of calligraphy, as well as the layout for the project itself, would be left up to me.)

I then started mentally planning the project. All this really means is that I spent a week thinking "I really should get started on that project." I really should get into the habit of drawing rough sketches of what I'm planning. Perhaps that way I'd have less surprises when I actually start.

In retrospect, it was a good thing I'd delayed, so that I could do it over Easter weekend (or I'm rationalizing. Probably rationalizing). Because I was being paid for it (and I had no idea what I should ask for, or expect, so I always brushed it off with "we'll discuss it when I deliver it"), I needed to be able to keep track of how much time was spent working on it, as well as keep from moving it too much, to avoid dog-earing it. One of my main concerns was that at my usual size (11"x14"), with a full frame, there would be very little space for writing, or that the writing would seem to be cramped and tiny, so I opted for a bigger board, which I could subsequently trim to size. However, I have yet to discover all the intricacies of sizing a project from the centre out, and I was trying to figure out a starting point, my mom chimed in with "she's an older lady--she'll have an easier time finding space for a smaller board", which certainly solved that problem. So I had to do it on an 11x14, and work it as best I could.

I was halfway through the first motif (and somewhat horrified at the amount of tracing I would have to do), when I noticed I'd screwed up: There was no way I'd be able to fit a full frame, with writing, so I'd have to cut back on the frame. However, by also starting with the left-hand frame, I'd also ensured that the bottom frame wouldn't fit properly (there wouldn't be sufficient space for two motifs; one motif would be too short; and that one motif would just look like it was stuck on). Off I go to grab another board, draw my edge marks, and start over, with the base first--this allowed the design to look like the base frame was supporting the left-hand frame. Of course, I still managed to screw up just a bit. Instead of starting in the bottom left corner, which would result in a small gap at the ends of both frames, I started in the top-left, meaning that there was no gap in the top-left, but there was one in the bottom-right.

After the tracing, came the "lining" (I'm sure there's a proper term for this, but I don't know what it is), where I go over the pencil with a thin pen. This, to my eye, allows the colours to come out as separate colours, with separate elements, as opposed to blurring together, had the colour been applied directly to the pencil; it gives the colours and elements definition. Once the lining was done (and a coat of fixative applied, so it wouldn't bleed), came the colouring. This part became a bit unusual. My parents had given me a set of coloured pencils for Christmas, but these were watercolour pencils. Meaning that as I sweat over my work (literally), the colours would bleed (I learned this on a project that will be the subject of an upcoming post). So my method turned into touching the sheet as little as possible, and only edge the reds. Then fix. Then fill the reds, then fix. Add the blue, and fix again.


Thankfully the colouring was done, because I was getting a touch loopy from smelling the fixative (I was not sniffing it, but it was in the ambient air...), so I got to take a short break, open the window and let it air, while I went and considered the scribing. A few calculations, and it turned out that instead of nice big letters, these would have to be quite small (of course), but still legible, and the script could still be seen clearly. The longest line, and the greeting, which I tend to do a size bigger (For example, if I write the main body with a 1 mm nib, at three nib-heights=3mm, then the greeting would be 1.5 mm, at 3 nib-heights, 4.5 mm. For those wondering, yes, I use Speedball nibs), still fit in the space allocated, which is one of my main panics at this stage. And to make it more impressive, instead of simply writing it with a right margin, I indented each subsequent verse, giving a descending-stairway appearance, which worked out quite nicely.

I was quite surprised to find that I'd spent 9.5 hours working on this. I didn't think my projects took so long, especially since on many of them, I would also work on them on my lunch breaks. And 9.5 was only the time spent sitting in front of the board. If I included all the time spent looking at various designs, and shortlisting the ones that would be best suited, as well as looking through my scripts, and doing various arithmetic, it would probably be closer to 12...

And here's the technical description! The design is a Palóc apron design from the town of Varsány, in northern Hungary (Palóc embroidery is renowned for its use of red and blue), and the script is in Bâtarde, which, combined features of Gothic script, with French Secretary hands--hence its appellation. It was used in the 15th and 16th centuries.

jeudi 29 mars 2012

Les fameux signets (The famed bookmarks)

Back in 2007, I was hired by the Toronto-area francophone public school board as a library technician at two schools, for a one-year contract. I'll admit I didn't do much. I didn't start any major projects, I didn't put into place any radical changes in the manner the libraries were run, because to my mind, they weren't "my" libraries, and I had no business changing anything. I was simply "holding the fort" for the permanent technician, who was due to return the next year.

One thing I did change, however, were the bookmarks the kids were using. These bookmarks were big, because their job was to hold the place of a book on the shelves, while the kids looked at them, and decided whether they wanted to borrow that particular book. And since these were elementary schools, some of the books were big, and so the bookmarks were just as oversized. They were over a foot long, and about an inch-and-a-half, two inches wide. But they were beaten up. Boy, were they beaten up. They were torn, creased, folded in two, and in some cases, as the lamination split apart, so did the paper. They also lacked something that said "This is the library!" One school's was simply numbered. Blank bookmarks, with a number on one end. And believe it or not, the kids actually found numbers to fight over. Seriously. You would have a kid whining "I wanted 34!", and another kid gloating that they were the best, because *they* got 34. At the other school, it had been one of the classes that had drawn them, with the resulting variability in designs... The boys didn't want the bookmarks that had rainbows and flowers, and the girls didn't want the ones that had guns and explosions (Really. At least one bookmark (I remember one clearly) had a number of small guns drawn with markers, along with starbursts explosions). These had been drawn by those that were then in grade 8, when they had been in grade 3. So they'd had five years of abuse, by at least four classes a year.

So I'd decided that I'd leave my mark in a way that was unobtrusive, but still unavoidable--I'd make both schools new bookmarks.


The idea was simple enough. Make bookmarks that clearly say "this is the library". Each bookmark was to have a quote written on it, on the topic of books, reading, writing, or the library. The quotes were mainly from francophone, primarily French, authors, although there were some German, Dutch, and English authors thrown in. As well as Groucho Marx. Due to the size of the classes, I had to make a large number of bookmarks (Thirty-four), which meant that I had to make 68 bookmarks (one set for each school), and find 68 quotes (two for each bookmark, one on each side), as well as images of 34 literary characters. The quotes couldn't be too long, should be understandable (or at least, I should be able to explain them), and the characters had to be from books that were contained in the library (and preferably by francophone authors).

It took me about two months to write up all the bookmarks, which was not too shabby, since it was tiring, and since this was my first project of this size, I had to deal with complications as they appeared. I had a number of different scripts to pick from, and I used as many as I could, and used a number of different ink colours as well. And mistakes were not uncommon. These I dealt with in the medieval manner: scrape off the ink, and keep going! Nice thing is, since I was using cardstock, these mistakes were sometimes difficult to find.


Finally, around mid-April 2008, I'd finished 68 bookmarks, split them up so each school got a set, and brought them in. I'd spoken about them for so long, and the kids had been asking when the new bookmarks would be in for so long, I decided to have a bit of fun with the "reveal"... The grade 3-4 class came in, sat down, and... waited. I started playing Carl Orff's "O Fortuna", because, really, isn't just the most dramatic choral and orchestral piece around? As the piece started, I picked up a wastebasket, then picked up and tossed in the old bookmarks. When the first "climax" hit (about 15 seconds into the tune), I triumphantly raised up the new bookmarks. The class started cheering, applauding... They were so enthusiastic, a teacher's aide came from the other side of the school scolding as to what all the noise was, since we could be heard on the other side.

I handed out the bookmarks, they marvelled at them, and within 15 seconds, they were being folded.

Oddly enough, the kids didn't believe me when I told them they were all hand-written. It would seem I did such a good job (and, well, who does calligraphy these days?), that they couldn't wrap their heads around it, until I would randomly write the name of one of the kids in various styles, that they would realize "well, geez, he really can write like that!"

They've survived four years of rough usage by the kids, and they'll hopefully be replaced next year, before they fall apart...


And they're very popular. I'm down to 28 at one school, and I have no idea how many still remain at the other school.